🖶

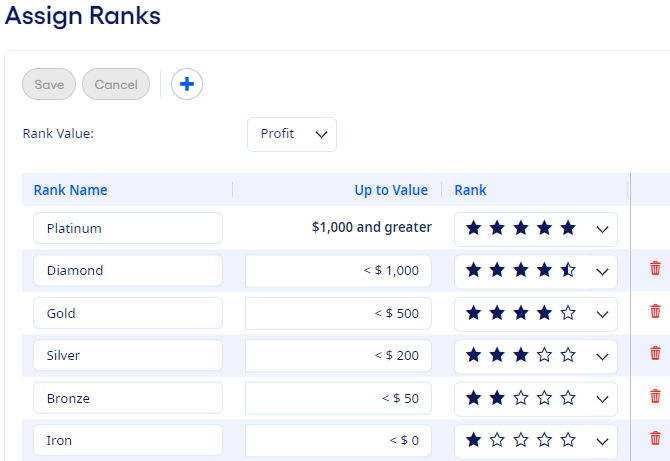
Setting Up Rank Tiers

You can set up tiers of relationship ranks on the Assign Ranks page.

You can add up to 10 ranks.


Assign Ranks page.

  1. Select Setup > Assign Ranks from the menu.
  2. Select a profit measure from the Rank Value drop-down list.
    Rank Value

    Identifies the profit measure that your institution uses to determine the rank assigned to each relationship. You can only use one measurement at a time. The measurements are calculated on aggregated relationship values. The following options are available:

    • Gross Profit - An amount measuring the Monthly Net Interest Margin plus Revenue from Services plus fees minus Loan Loss Provision.
    • Contribution - An amount measuring the Monthly Gross Profit minus Direct Expenses.
    • Profit - An amount measuring the Monthly Contribution minus Overhead Expenses.
    • Value Added - An amount measuring the Monthly Historical Profit minus Cost of Capital.
    • ROA - A ratio of Historical Profit to Interest Income.
    • ROE - A ratio of Historical Profit to Capital.

    When ranks are established and you change the Rank Value from an amount measure ($) to a rate measure (%) or vice versa, you must set a new Up to Value for all existing ranks. Each rank's previously defined name and star icon are retained.

    Tip: Select Cancel to restore the former Rank Value with its associated rank limits.
  3. Select ""Add to add a row to the grid.
    You do not need to add the ranks in ascending or descending order because the ranks dynamically adjust when settings are saved.
  4. Enter a unique Rank Name for the new rank that is descriptive of its position in the overall hierarchy of ranks.
    No special characters are allowed.
  5. Specify an appropriate maximum value for the current rank for the Up to Value based on the Rank Value measurement in use.
  6. Select the number of stars that represents this Rank.
    The application allows you to define as many as 10 ranks by selecting icons ranging from one-half star up to five stars.
  7. Repeat steps 3–6 to add additional ranks.
  8. Select Save.

If you must add additional ranks after saving, then you can add new ranks until you reach the maximum of 10 ranks. For existing ranks, you can change the Rank Name, Up to Value, and Rank fields as needed.

Note: Historical records are not affected when ranks are modified or deleted. For example, if a rank was associated with certain relationships when processing occurred in the past, then it continues to appear in the appropriate historical months even if it is modified or deleted later in the current month.