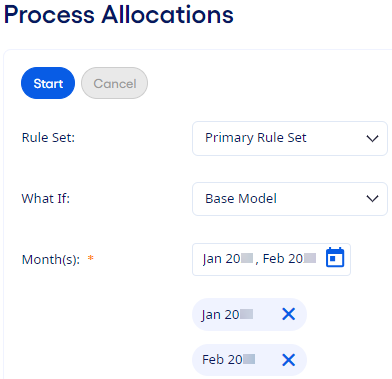
You can process allocations using allocation methods and rule sets on the
Process Allocations page.
Your institution must be licensed for
Organization Profitability to see this module.
-
Select from the menu.
-
Select a Rule Set.
-
Select a What If model.
-
Select Months to include.
-
Select the
 Calendar to open the Select Time Frames
dialog box.
-
Select individual months to include, or use Select All to
select all months.
-
Select Apply.
-
Review any messages that appear at the top of the page.
Messages can appear if allocations were processed for the selected
months, but the setup has changed since they were processed. If you reprocess the months,
then the process uses the current setup.
-
Review the selected months in the list.
-
Remove any months that do not need allocations processed or reprocessed.
Months that were processed show a date and time stamp and the user who completed
the process.
-
Select Delete Results to delete the processed allocated
results before processing allocations, if needed.
This option is available if you must modify or delete an existing allocation rule
that was previously used to process allocations.
-
Select Use Imported FTP Rates When Available to specify that
you want to use the imported FTP rates to process allocations.
This option is available if both imported historical FTP rates and Financial
Performance Suite (FPS) rates are found for the selected months.
-
Select Start to begin processing allocations.
You can Cancel the allocation process anytime
before it completes.
A notification shows when the allocation process completes.
The standard Allocation and FTP Exceptions report
generates automatically, and you are notified when it is ready to view and download.
You can generate the Allocation and FTP Exceptions report anytime from .

