With filters and saved views, you
have control over how data appears in the grids.
-
Select one of the following options from the menu:
-
Verify that
All Relationships appears in the My Saved
Views drop-down list.
This default view shows all the unfiltered data in the grid.
-
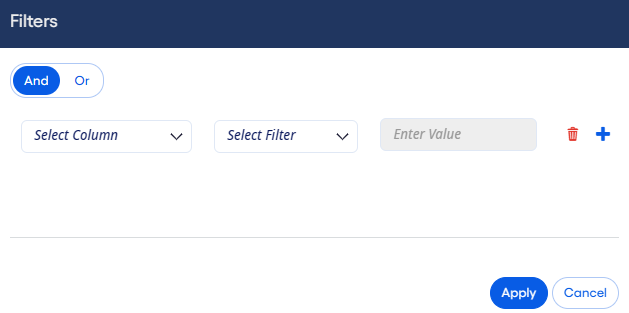
Select Filters.
The Filters dialog box opens.
-
Select Or to change the filter relationships, if needed.
-
Select the column that you want to filter in the Select Column
drop-down list.
-
Select one of the Select Filters options.
Filtering choices can vary depending on the selected column. For example,
when the column data is amounts or rates, the filter options are
Equals, Does Not Equal, Greater
than or Equal, and Less than Equal.
-
Enter an appropriate value for the column in the Enter Value
field.
-
Select
 Add to add additional filter rows as needed.
You can use the
 Delete
 option to remove filter rows if needed.
-
Select Apply to filter the grid by your defined criteria.
The grid is sorted appropriately, and a notice appears above the
grid showing the filter that is in use. You can select the notice to remove or modify the
filter.
-
Select Save As New View.
The Save As New View dialog box
opens.
-
Enter a View Name.
-
Select Save to close the dialog box and return to the
grid.
The name of the new filtered view appears
in the My Saved Views drop-down list.
You can select
Save As New
View to change the name of the current saved view. Select
Delete to remove the saved view that you are currently using.