Viewing Balance Sheet Allocation Results

You can view pre-allocated or post-allocated balance sheet results on the Balance Sheet page.

The Balance Sheet grid that shows allocation results refreshes immediately as you select options for how to view allocation results.


Balance Sheet allocation results.

  1. Navigate to the Profitability > Organization > Balance Sheet page.
    Your institution must be licensed for Organization Profitability.
  2. Select a What If model.
  3. Select a Rule Set.
  4. Select a Layout.

    The layout determines how the allocation results appear in the grid. Options change based on the selected layout.

    Accounts by Organization
    This layout shows accounts as rows and organizations as columns. The Data Item option is available when you select this layout.
    Accounts by Timeframe
    This layout shows accounts as rows and selected time frames as columns. The Data Item and Organization options are available when you select this layout.
    Accounts by Data Item
    This layout shows accounts as rows and the data items as columns. The Organization option is available when you select this layout. You can select the Columns option to show or hide data item columns.
    Data Item by Timeframe
    This layout shows the data items as rows and selected time frames as columns. The Organization and Account options are available when you select this layout.
  5. Select one or more Time Frames depending on the selected Layout.
    When you select the Accounts by Organization or Accounts by Data Item layouts, then you can select one time frame. When you select the Accounts by Timeframe or Data Item by Timeframe layouts, then you can select multiple time frames.
  6. Select a Data Item, if applicable.
  7. Select an Organization, if applicable.
  8. Select an Account, if applicable.
  9. Select Hierarchy or Groups to view related results.
    This option is only available if your institution is using organization groups. If you select Groups, then a drop-down list appears for you to select which groups appear in the results.
  10. Select Post-Allocated or Pre-Allocated to view related results.
    The Post-Allocated option is the default option.
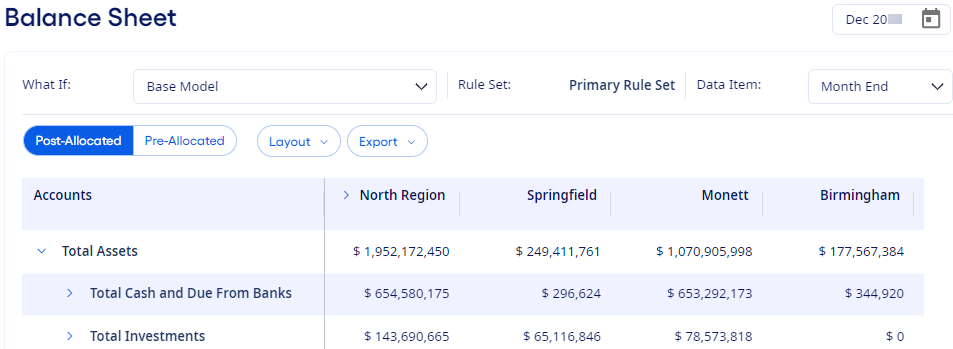
You can export the allocation results to Microsoft® Excel® or to a .csv file.